Tuesday, December 31, 2013

Touching up Old Butterfly JPEGs (Part 2)

Here is another installment in my Mackinac Island butterfly series from The Butterfly House.

What I did to process these images: 1) I took the original JPEG into Adobe Photoshop Elements 2.0 (dark ages, remember?). 2) I saved the image into a PSD file, and bumped the brightness up 50 and bumped it down 50 to create two more PSD files. 3) I dragged all three files into Photomatix, and... Voila!

Here is the original JPEG image:


And here is the Photomatix edited version:


The Photomatix version has a little bit more of a 'surreal' element going for it, which -- if that's your thing, you'll like it, and... if not, you'll probably hate it. Me, I wanted to bring out the colors in the butterfly (it almost has a stained glass window look to it). I don't like the look of the flower above the butterfly in the Photomatix version; I suppose I could Photoshop the old flower over top of the new one, or simply Photoshop the new butterfly into the old photo.

Monday, December 30, 2013

Touching up Old Butterfly JPEGs (Part 1)

Being winter (and being kind of a wimp about taking my camera outside in the cold), I have been going through my old (ok, last year -- 2012) Canon XTi JPEG photo files and seeing what I can do with them in Photomatix.

These images in this particular series come from one of my trips to Mackinac Island. If you have the time to stop into The Butterfly House (and if you actually like butterflies), I think you will find this place to be a real treat.

Here's my original file:


And here's the file touched up in Photomatix. (The difference is quite striking.)


Sunday, December 29, 2013

Palm Trees to Non-Floridians

On her first trip to Florida, my wife made it a point to snap some pictures of the palm trees, because, being from Michigan originally... well... you know how well palm trees grow in Michigan, right?

So on our family trip to Florida this past fall, we made sure to take a few (ok, several dozen) pictures of palm trees as well.


Saturday, December 28, 2013

Disney Foliage on Tom Sawyer Island

Here's some HDR waterfall/foliage from our trip to Disney this past (late) summer(/early fall). This particular scene is from Tom Sawyer Island.


Friday, December 27, 2013

Fish in the Sea, How Can that Be?

As I processed this photo that I took at Disney's Animal Kingdom, I had this line running through my head from some Dr. Seuss-style children's book (maybe it was Seuss himself?) -- "Fish in the sea, how can that be?" I don't remember the exact source, or whether I have even gotten the quote exactly right, but... that's what I was thinking.

There were a lot of fish in this tank! If it's difficult to get a group of people to pose just right, imagine trying to do the same with a group of fish! (Or is it technically a school of fish, even if the fish are not all of the same kind???) Ok, we'll attribute the posing to dumb luck, if there can be any attribution to catching animals in a pleasing pose for a shot.

I ran this single image (the moving fish would have ghosted; that would be a different photo altogether) through Photomatix 5 for HDR, and then I scooted the result over to AfterShot Pro for a little NoiseNinja magic and some color tweaks. Result: Fish in the sea, how can that be?


Thursday, December 26, 2013

Sometimes HDR can be a Little Too Much?

There is only so much detail that a person can take in. Our brains operate on a 'need to know basis', and we have mental filters -- to block out all of the non-essential details that we 'don't need to know'.

These were my thoughts as I looked at today's picture, a flashback to an early fall trip down gravel roads toward some lake photography. I'm not sure if the HDR enhanced it, but there was something in the details of all the leaves that made this picture seem... overwhelming.


As I took this picture over into Corel AfterShot Pro, I began to wonder if some of my issues with the picture had to do with "noise"; I cranked up the "Noise Ninja" and came up with the following:


The edit seemed to help a little. What do you think?

Wednesday, December 25, 2013

Tuesday, December 24, 2013

Staring Down a Northern Pike

I have some good winter memories of fishing for Northern Pike up in the Baudette Bay. At the time, I don't think the bay was exactly known as a 'fishing hot spot'. More fishermen (at least at the time) would use the bay as a launching point to get their boats out into the Rainy River (or they would simply make the drive out to Lake of the Woods; both the river and the lake were far more likely to yield the 'much more desirable' walleye).

I remember one winter of fishing with my tip-ups, which yielded a couple of good-sized pike that I pulled through the ice. My bait was something frozen, 6-inches or so; most of the time I used frozen smelt that was sold specifically as bait. On one particular adventure, the two pike that I pulled through the ice were 33 and 36 inches; they put up a good fight to be brought through the hole. (I loved to listen to the sound of the tip-up line whirring as these fish took the bait; it was a good sign that you had something nice on the other side of the ice.) As fun as it was to catch these pike, I had to throw them both back; they both fell within the 30-40 inch 'catch-and-release window' that was being enforced at the time. Still, catching them is a good memory.

I only happened to 'catch' the pike below with my Canon XTi, while walking around at a zoo. Coming across this picture file (JPEG) the other day, I sent it through Photomatix. First below is the unedited file, followed by the Photomatix 5 version. (As you can see, I am also going to have to learn how to use the kind of photo editing software that will take all the dust and dirt and such off of the aquarium glass....)


Monday, December 23, 2013

Cut-and-Paste HDR Jonagold Apples

The more I try to process apples through HDR, the more I wonder whether apples really work in HDR, or whether I would be better off making applesauce?

Here are a few of my attempts through Photomatix 5. (11 exposures, -5 to +5.)


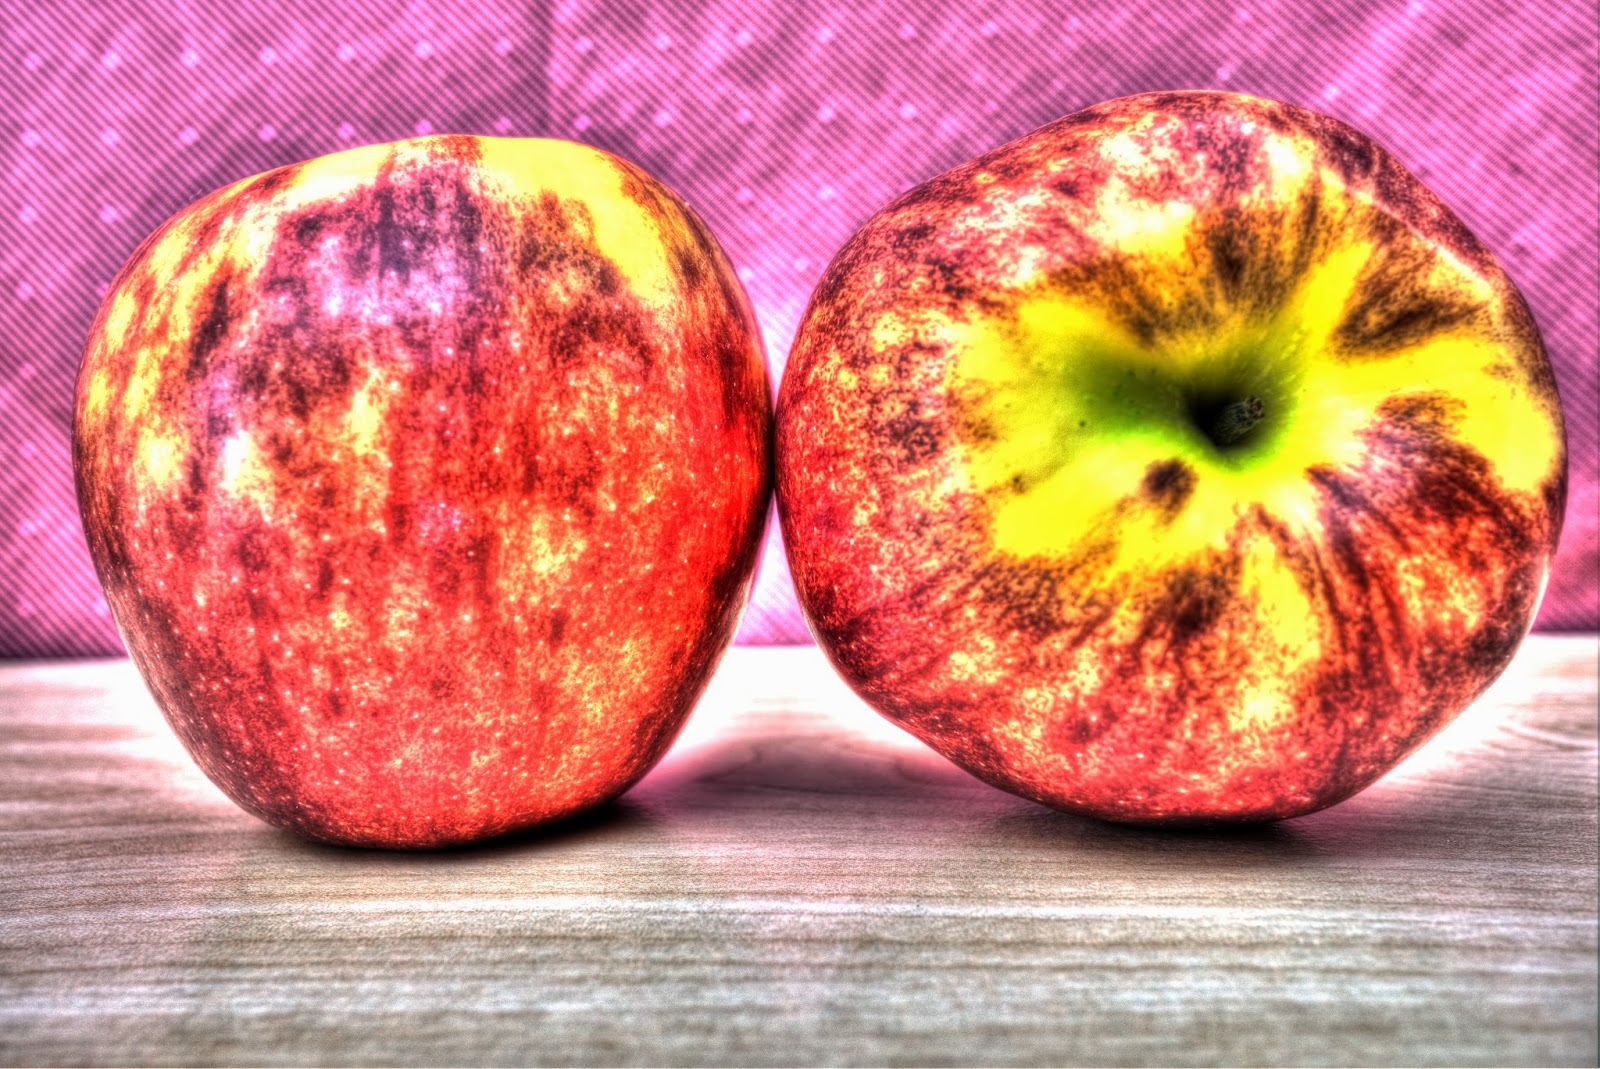
Preset: Trey Ratcliff's "Bob Ross Has Not Left"

This preset brings out both the reds and the yellows in the apples. Some spots have a wood-grained texture. Other spots look as though they have been sponge-painted.


Preset: Trey Ratcliff's "Mega Extreme Do Not"

(I know Trey says not to, but... I really like this preset...) The red comes out quite deep in this setting, producing a slightly more dramatic presentation than the "Bob Ross" setting above.


Preset: Trey Ratcliff's "Poo Corner"

When I use the "Poo Corner" preset, it gives an almost 'old world' feel to the images. I'm not quite sure that's what it does for these apples, but I have noticed it elsewhere. (See for example my post on the Hotel Lobby Christmas Decorations.)


Preset: Photomatix 5 "Enhanced 2"

This image looks quite bland when compared to Trey's settings above. While this presentation is definitely more 'muted', what I like about it is that it still preserves the 'white spots' on the apples. (They almost look like stars reflected on the apple skins.)


Preset: Photomatix 5 "Surreal"

The "Surreal" setting puts these apples out a little bit more on the 'wild side'. No, these apples won't look like this in real life. (Looking at the apples this way, I'm not even sure that I would really want to eat them!)


Preset: Photomatix 5 "Surreal 2"

I think Photomatix's "Surreal 2" is very similar to Trey's "Mega Extreme". (The only immediate difference that I notice is the absence of the warning labels, saying: "Do not use!")


Preset: Photomatix 5 "B&W Natural"

And then, perhaps ironically (at least for someone who does not do a lot of black and white photography), the setting in which the apples seem to me to look - most naturally - like... apples... was this one:


Now, not being one to leave it alone, I opened up some of the images in my ancient version of Adobe Photoshop Elements (2, for those who are keeping track), and -- with a little bit of layering and eraser magic, I came up with this:


Sunday, December 22, 2013

Round Two: Two Paths to a Pseudo HDR: Orangutan Ceiling

So, here's another go at the game of "Pseudo-HDR: '1 image' vs 'multiple exposures generated from 1 image'". This time, I picked out one of my old JPEG files -- another orangutan image that I shot (with my Sony DSC-F707 camera) at the Fort Wayne Zoo back in 2002.

I used Corel AfterShot Pro to convert the original JPEG into a TIF file (converting 592 KB to 7.04 MB). Next, I opened the TIF file in AfterShot Pro and made adjustments in the exposure setting, ending up with files set at exposures of -3, -2, -1, 0, +1, +2, and +3.

In the processing run through Photomatix 5, I used the Factory Setting "Vibrant" and bumped the contrast on each resulting image to "mild".

First up is the original, unprocessed JPEG file:


Next is the JPEG version of the Photomatix-processed single TIF file:


Finally, the version that is Photomatix-processed from multiple TIF files, with exposures generated from -3 to +3 by steps of 1:


Differences:
The differences are obvious between the original file and the HDR-processed files. By comparison, the HDR orangutans 'pop' out of the image, whereas the original orangutan is simply hiding in the dark.

The original file weighed in as a 592 KB JPEG. The single file tonemapped came out as a 1.08 MB JPEG, whereas the second multiple-file tonemapped version came out as a 1.03 MB JPEG.

When you look at the two processed images side-by-side, you notice that the orangutan in the single processed file is slightly darker than the orangutan from the multiple file version. (This would make sense from the brighter exposures that were worked into the 'multiples' image.) Perhaps the smaller file size of the 'multiples' image has something to do with it being a brighter image?


Verdict? I think in this version, that I am going to give the slight edge (between two otherwise almost virtually identical pictures) to the single file processed version as being my personal preference.

Saturday, December 21, 2013

Orangutan at the Fort Wayne Zoo (2002)

Back in 2002 when I lived in Fort Wayne, I had an annual pass to the zoo. I liked to do laps around the zoo -- it was a scenic place to get exercise. And: I also took along my new (at the time) Sony DSC-F707 to take lots of pictures.

One of my favorite exhibits was the orangutan room. The orangutans were 'sealed in' behind a glass wall (see what I said a few days ago about taking your pick between shooting pictures through a dirty filter or not shooting at all...). Suffice it to say -- by the time that my pass expired, I had collected quite a few orangutan pictures.

First up is the original JPEG image that was shot through my DSC-F707.


For the next image, I sent the file through Corel Aftershot Pro. (I also have Corel PaintShop Pro X6, but I haven't really used it yet. I tried once, and my computer froze up. I think it was because the program was loading into its memory all of the hundreds of photos that were in the chosen file folder. I'm going to play around and see if I can come up with something to make it work. I picked it up for $28 in the week following Black Friday/Cyber Monday.)


At the end of the editing process in Aftershot Pro, I saved the file as both a JPEG and a TIF, hoping that I might be able to get a little bit more out of the image as a TIF when I sent it through Photomatix. At this point, I'm not sure whether I like the Corel version or the Photomatix version. Which do you prefer?

Friday, December 20, 2013

Two Paths to Making a Pseudo HDR from One Image

So, I took up my question from yesterday and gave it a try: How does the processed version of (1) a single RAW image file compare with the processed version of (2) a RAW image file that has been manually adjusted in Image Data Converter (or the editing program of your choice) to produce extra RAW files at various levels of brightness? (Here, I ran the file through IDC and produced adjustments at -2, -1, +1, and +2 to run with the original file through Photomatix 5.) In both of these tests, I used Trey Ratcliff's "Quaint Hobbit Holes" preset, and I also bumped the contrast on each image to "mild".

The image that I chose for this comparison test is another shot from my "On the Road Again" files from the other day. I snapped a picture (ok, 14) of the Long Rapids Township Hall as we were driving by.

First up is the processed version of (1) the single image file:


Next, we have the (2) version for which I took the single RAW file above and generated four other images at varying levels of brightness (as indicated above):


Differences:
The first file weighs in at 17.5 MB as a JPEG file; the second, 19.2 MB.

Visibly, the only major difference that stood out to me is a color difference that appears on the red "Danger" sign above the "NO TRUCKS SIGN".


Verdict? I'll probably keep testing to see if I can arrive at something more conclusive.

Thursday, December 19, 2013

On the Road Again

On my recent travels through northern Michigan (ok, the northern parts of the lower peninsula), I took a few pictures out the car window. (Ok, a few hundred pictures out the car window.) (Ok, almost a thousand pictures through the car window.) I had my Sony NEX-7 set to Speed Priority mode, where the camera basically locks in the autofocus for the first shot, and then fires a series of shots afterward set to the same focus setting.

Why would I do such a crazy thing -- as shooting nearly a thousand pictures from a fast moving vehicle?

Number one, it was a little chilly outside. Temps were sitting somewhere roughly ten degrees below freezing (in the 20s Fahrenheit). I'm not really a fan of the whole idea of taking my camera out into the cold (I'm slightly skeptical of the whole "throw your cold camera into a sealed plastic bag in order to prevent moisture from getting inside the camera" trick; does it really work???)

Number two, since I was on my way to the airport, ready to head back home, I didn't really have time to stop and take pictures of every scene where I would have liked to have stopped and taken pictures.

I realize that shooting through a car window is somewhat like shooting through a really dirty filter, but... sometimes you take the shots that you can get. I figured that shooting pictures this way would be better than nothing, and it would give me something to play around with in the photo editing software.


Don't worry, I wasn't driving. (Safety first, kids!)

For this picture, I edited my RAW image -- creating one that was bumped up two on the brightness of the exposure value and another that was bumped two down. I then merged them all together in Photomatix 5, and then moved the resulting image over into Corel Aftershot Pro to crop the image, make a few tweaks, and voila!

At some point, I'd like to run a test to see whether I am actually better off creating the extra RAW images (in the above fashion; I use Image Data Converter) that I afterward merge together to create an HDR, or whether I am simply better off running a single RAW file through Photomatix to create my pseudo-HDR.

Wednesday, December 18, 2013

How Do You Like Them Apples?

I'm still kicking around ideas on my fruit photography project. This particular piece here will probably make it into the 'learning experience' section of the project. What's wrong with this photo?


The light -- Natural light is coming in through the windows immediately opposite the apples. So much light is coming in, that it has created white spots on the apples.

Focus -- at f/1.8, the front two apples are fairly well focused. The back apple? Not so much. This would be great if I had a line-up of apples, with the last apples fading out into the distance. With this particular arrangement, almost a family portrait triangle arrangement (if you ignore the dead banana under the tallest apple...), you wonder why tall apple is not in focus?

Arrangement -- And, while we're talking arrangement, what do I have going on with this arrangement? Yes, I do have a triangle going on here, which is aesthetically pleasing as far as triangles go, but if you're going to get a handful of apples together to pose for a picture, is a triangle the best you can do?

Kicking these thoughts around...

Tuesday, December 17, 2013

Cropping a Roadside Shot of an Abandoned House in the Snow

My attention was directed to this abandoned house for a photo op, so I set up shop on the road and started firing away for the images that I would combine into an HDR image. (As you can see in the foreground, a barbed wire fence discouraged photographers and others from making their way in for a close-up photo. Shooting with a fixed 24mm lens, I was pretty well stuck with a roadside view. The NEX-7 does shoot big enough, that I could get in a decent cropped view.)


Black and White and a Little Color

Here is a picture where, in post-processing, I only really liked two of the colors - the red and the blue on the structure in the foreground. (The rest of the colors in the picture were not really worth writing home about.)

So, I implemented a trick that I learned online: After I used Photomatix to create the first HDR image with the colors that I really liked, I went back and created a second image in black and white. I then opened up Photoshop (Elements 2 -- I know, Dark Ages...) and opened up the black and white image. I created a second layer and pasted the color image over top of the black and white image. Using the eraser tool, I took out all of the color... except for the red and the blue that I really liked in the first place. Here is the result:


Monday, December 16, 2013

F-stop Comparison -- Plant in a Hotel Lobby

When beginners/amateurs (like me!) hear about 'setting your F-stop', we think that you are speaking a foreign language to us that we will never understand! (We want to run back to the 'automatic' setting on our cameras....)

The simplest explanation (that has stuck with me) of how an F-stop works is to think of a line of ten people. They are standing in line in front of your camera, each waiting his turn to get his picture taken.

If you take a picture of this line of people at a low F-stop (example: f/1.8), only the first couple of people who are closest to the camera will be in focus; the rest will be blurry.

As you increase the F-stop, more and more people will be in focus. A high number F-stop (example: f/22) will not only get the whole line of ten people in focus, but probably most of the background as well.

Why wouldn't you want everything to be sharply in focus? I suppose, it depends on the 'focus' of your picture. If you want to capture all of the details in a particular scene, then you would want to set your F-stop out to something higher (higher than f/1.8, although you may not necessarily need to go out as high as f/22). If there is really only one element that you want to be the 'center of attention' in your picture (you only want to catch a picture of that first person in line), then you would set your F-stop lower (to something like f/1.8).

Another reason that you wouldn't want to shoot at your highest F-stop is that high F-stop pictures will take longer than those where the camera is set to a lower F-stop setting. Depending on how much light is available to you, a higher F-stop might take you beyond 'hand-held' ability and into the realm of needing a tripod (or other stationary mount for your camera).

Here are two HDR compositions built from two sets of photos that I took in a hotel lobby; the first set was shot with an F-stop of f/1.8, the second f/22. I liked this plant well enough to sit and shoot 50 pictures of it with a remote control and my Sony NEX-7 (mounted on a tripod). You'll notice in the first picture (f/1.8) that the plant is in focus, while the background (the stocking on the fireplace, the tree and lamp) are blurred. While the background items are in-focus in the second picture (f/22), I'm actually fonder of the first. What are your thoughts?


Sunday, December 15, 2013

Hotel Lobby Christmas Decorations

Hotel lobbies don't have to be architecturally extraordinary to pick up some nice pictures. These are from the Country Inn and Suites, decorated for the Christmas season with a tree and poinsettia. These particular images were processed to HDR on Photomatix 5 from eleven RAW file photos (-5 to +5) taken with a Sony NEX-7.


Saturday, December 14, 2013

Christmas Decorations at the Mall (Part 3 -- Light Displays)

I was also impressed with the Christmas lighting displays at the Mall of America. Two of the pictures below show strands of lights hanging down from the ceiling. A third picture is of the palm trees wrapped in Christmas lights at one of the restaurants. (I'm not sure if they just do that for the Christmas season, or if their palm trees are wrapped that way all year round.)


Friday, December 13, 2013

Christmas Decorations at the Mall (Part 2 -- Ornamental Installations)

Following the theme of extreme Christmas decorations at the mall, I found this set of 'larger than life' ornamental installations at the Mall of America in Bloomington. These ornaments were easily taller than I am, and were set both in the penny fountain as well as suspended from the ceiling.


Thursday, December 12, 2013

Christmas Decorations at the Mall (Part 1 -- The Tree)

If you want to see Christmas decorations done to the extreme, the mall is the place to go. Specifically in this case, I am visiting the Mall of America in Bloomington. Today's pic is one of the lighted Christmas trees in the mall; I can't get over the size of this thing! (Count the floor levels next to the tree....)


Pictured below is the big screen television screen next to the Christmas tree. (And I thought that the tree was big!) The mall provides seating, and there are usually people sitting there, watching a show. 


Wednesday, December 11, 2013

The Kensington Runestone

Depending on how this image is processed, it is either a picture of the Kensington Runestone, or a reflective selfie. :) This picture is a JPEG taken in 2010, back when I was shooting with my Canon XTi.

The text (from Wikipedia) on the Runestone reads:

Eight Götalanders and 22 Northmen on (this?) acquisition journey from Vinland far to the west. We had a camp by two (shelters?) one day's journey north from this stone. We were fishing one day. After we came home, found 10 men red from blood and dead. Ave Maria save from evil.

(side of stone) There are 10 men by the inland sea to look after our ships fourteen days journey from this peninsula (or island). Year 1362

I am looking forward to making it back to the museum, to take pictures with my NEX.


Tuesday, December 10, 2013

Salmon Milling around the Falls

While on vacation this past autumn, we happened to catch the salmon running up the local falls. Taking pictures of the salmon gives me an appreciation for what wildlife photographers do (i.e., there's a lot of patience and skill that goes into their photographs, as you sit around for a long time waiting for the salmon to do something interesting... like, jump up the falls! ... and nothing happens.)

(10/9/13, Sony NEX-6)